Organization Structure#
The Organization Structure feature allows you to manage your institution’s organizational hierarchy and maintain important institutional identifiers. This is essential for tracking author affiliations and exporting data to standardized formats.
Overview#
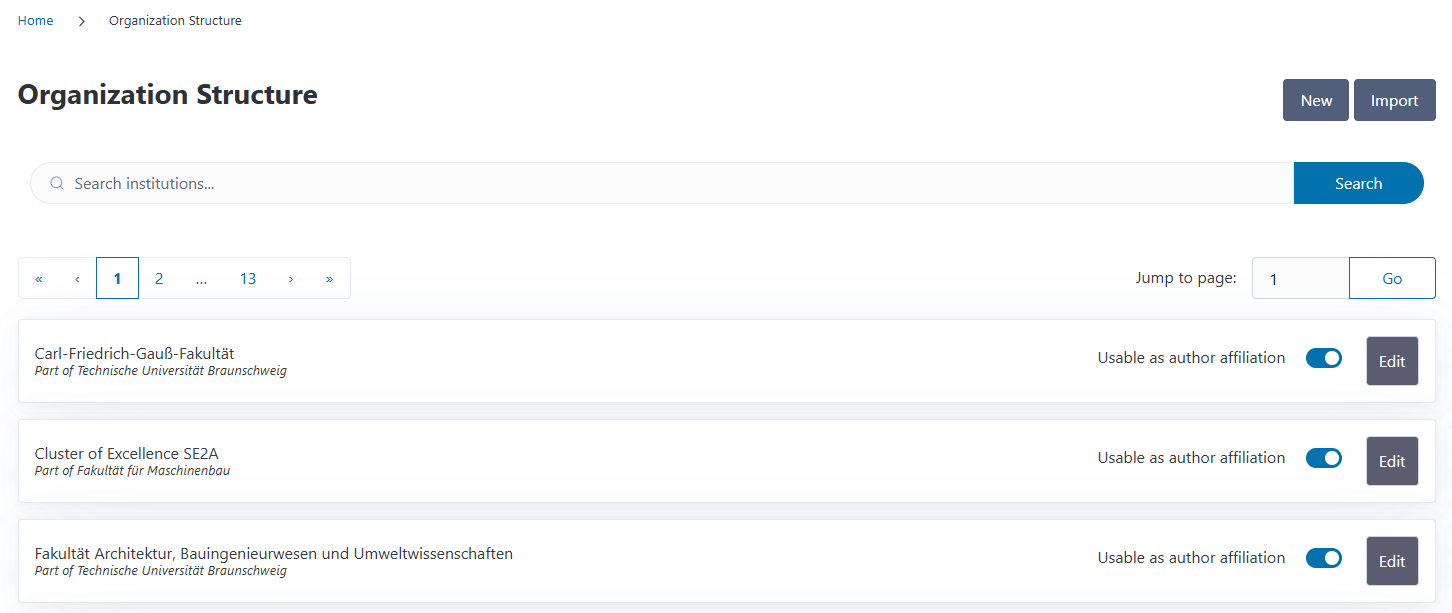
The Organization Structure overview page displays all institutions in your system. Each institution entry shows:
Institution name
Parent institution (if the institution is part of a larger organization)
A toggle switch to control whether the institution can be used as an author affiliation
Edit button for updating institution details
You can search for institutions by name using the search box at the top of the page.
Viewing Institution Details#
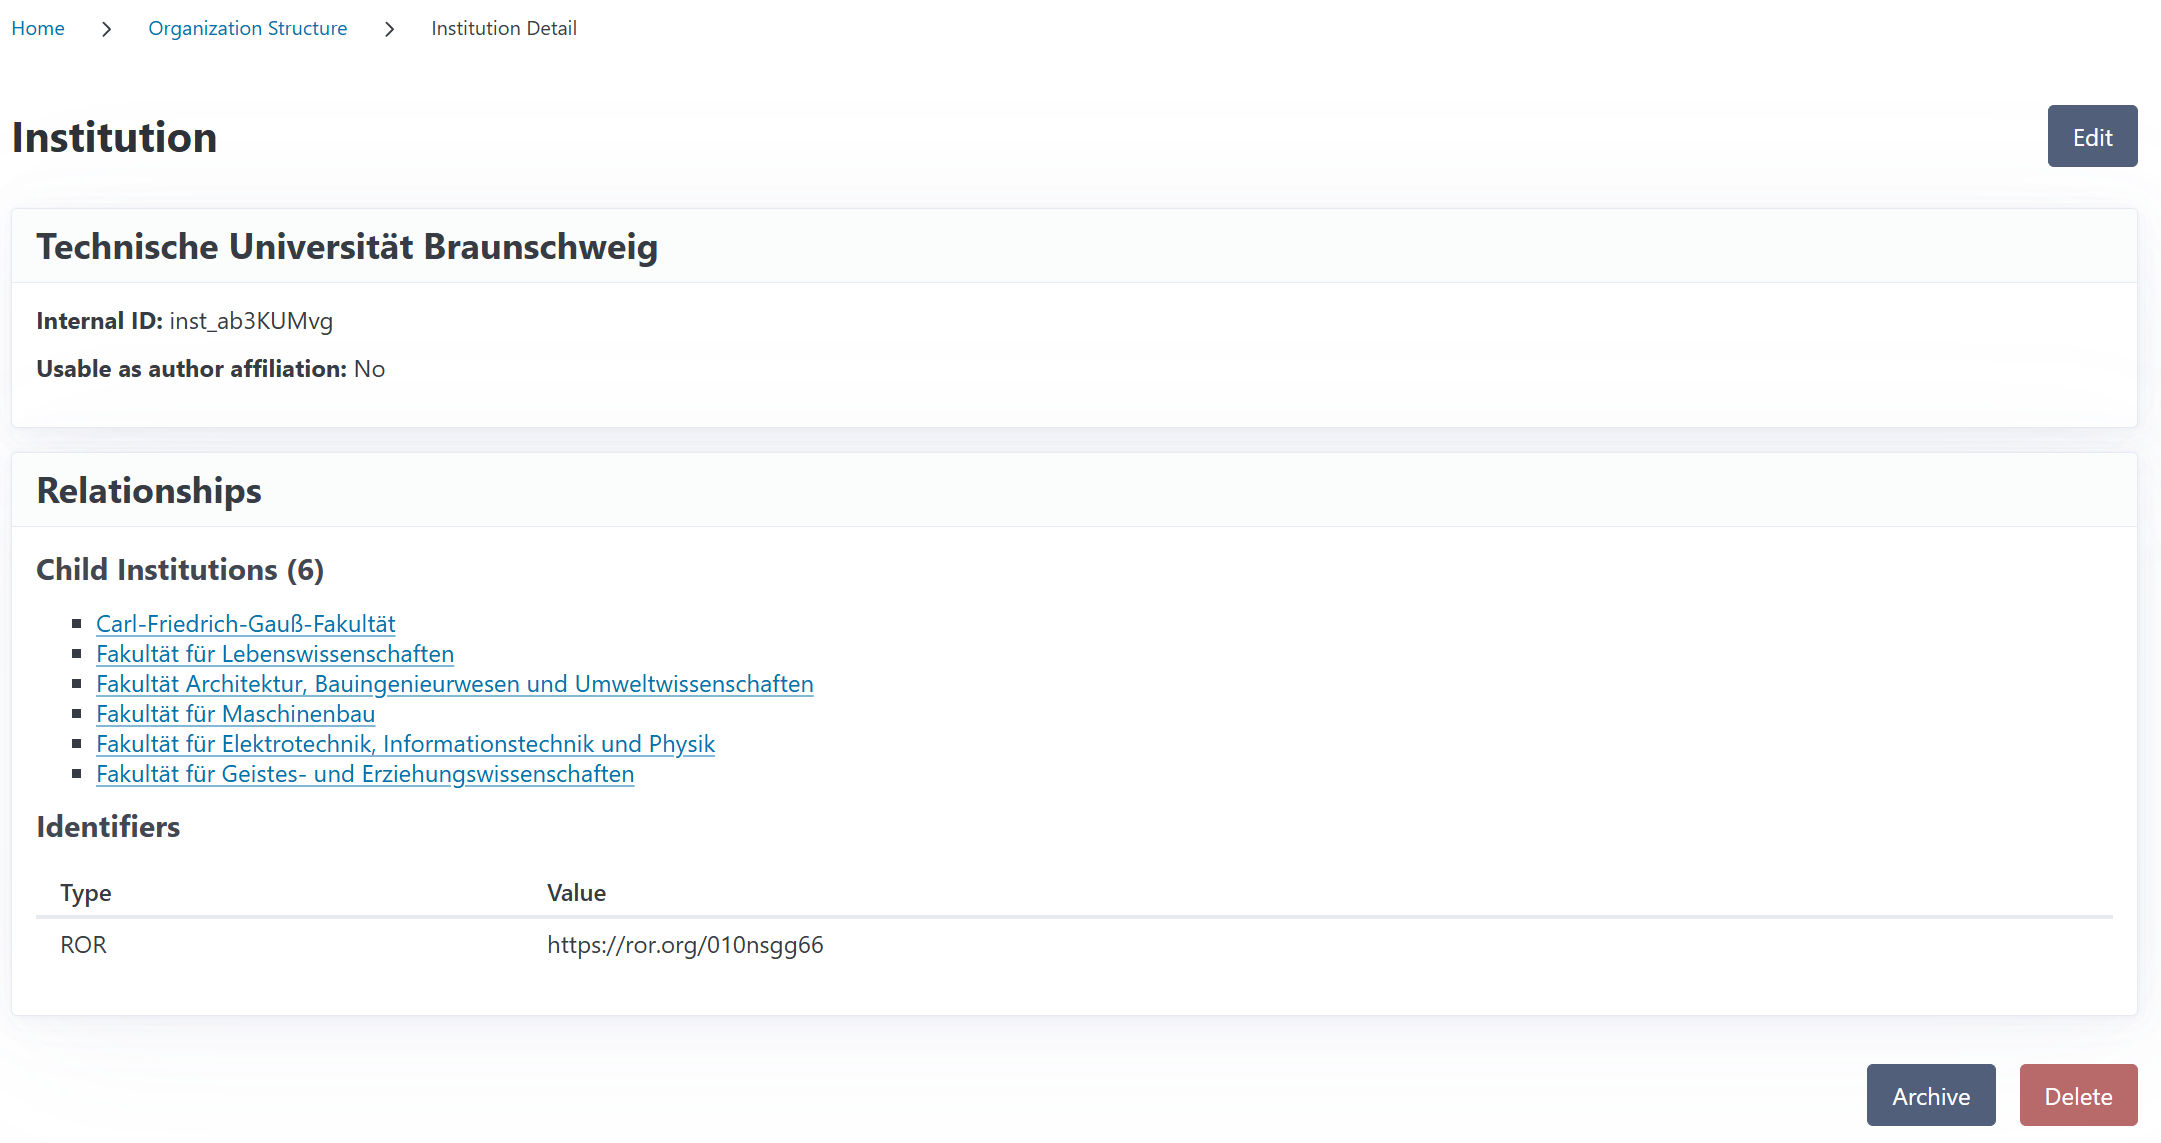
Each institution has a dedicated detail page that shows comprehensive information about the institution and its relationships. To access the detail page, click on the institution’s name from the Organization Structure overview.
The detail page displays:
Basic Information: Institution name, internal ID, parent institution, and archived status
Identifiers: All ROR, ISNI, and Ringgold identifiers associated with the institution
Relationships:
Child institutions (sub-organizations within this institution)
Funding requests with authors affiliated with this institution
Invoices funded by this institution’s funding sources
Action Buttons: Edit, Archive, Restore, or Delete buttons depending on the institution’s current state
Institutional Identifiers#
CODA supports three types of institutional identifiers that are used for standardized data exchange and reporting:
ROR (Research Organization Registry)#
ROR IDs are persistent identifiers for research organizations worldwide. They look like this: https://ror.org/02mhbdp94
ROR IDs are used extensively in scholarly publishing and are required for many funding applications and data reporting standards. They are the preferred primary institution identifier for generating an openCost report.
Example: https://ror.org/05dxps055
ISNI (International Standard Name Identifier)#
ISNI is an ISO standard for uniquely identifying contributors to creative works. For institutions, ISNI provides a globally recognized identifier.
ISNI values are 16 digits and can be formatted with spaces or hyphens: 0000 0001 2103 2683 or 0000-0001-2103-2683
Example: 0000 0001 2103 2683
Ringgold#
Ringgold identifiers are used by many publishers and library systems to identify institutions. They are numeric identifiers without special formatting.
Example: 123456
Note
You can add identifiers to your institutional structure by using the edit button.
Validation#
CODA automatically validates institutional identifiers when you enter them:
ROR IDs must follow the format
https://ror.org/followed by exactly 9 charactersISNI values must be exactly 16 digits (with or without spaces/hyphens)
Ringgold IDs must be numeric
If you enter an invalid identifier, CODA will show an error message and prevent saving until you correct it.

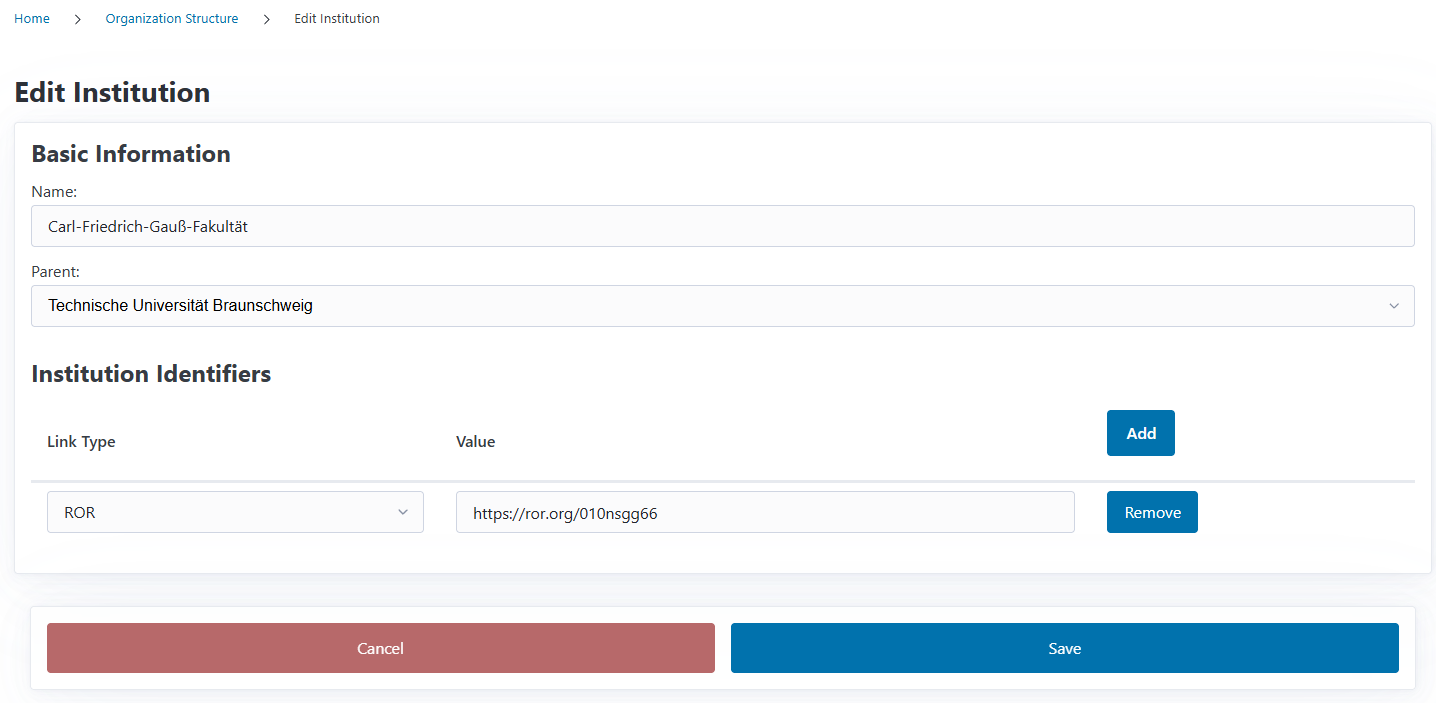
Creating a New Institution#
To add a new institution to your organizational structure:
Click the New button on the Organization Structure overview page
Fill in the Basic Information:
Name: The full name of the institution (e.g., “Department of Biology”)
Internal ID: You can provide a custom identifier, or leave blank to auto-generate one (format:
inst_XXXXXXXX)Parent: Optionally select a parent institution to create hierarchical relationships
Usable as author affiliation: Check this box if authors should be able to select this institution when adding their affiliations
Add Institution Identifiers (optional but recommended):
Click Add to create a new identifier row
Select the identifier type (ROR, ISNI, or Ringgold)
Enter the identifier value
You can add multiple identifiers of different types
Click Save to create the institution

Tip
You can add multiple rows to include all relevant identifiers for your institution. For example, you might add both a ROR ID and an ISNI for the same organization.
Editing an Institution#
To update an existing institution:
Click the Edit button next to the institution you want to modify
Update any of the basic information fields
Add, modify, or remove identifiers as needed
Click Save to apply your changes
Note
If publications or contracts are already linked to an institution, updating the institution’s identifiers will ensure future exports use the updated values. However, previously generated reports (like openCost exports) are snapshots and won’t be affected.
Organizational Hierarchies#
CODA supports hierarchical organization structures by allowing you to set parent-child relationships between institutions. This is useful for representing your institution’s actual organizational structure.
Example hierarchy:
University of Example (parent)
Faculty of Sciences (child of University)
Department of Biology (child of Faculty)
Department of Chemistry (child of Faculty)
Faculty of Humanities (child of University)
To create a hierarchy:
Create the top-level institution first (e.g., “University of Example”)
When creating child institutions, select the parent from the Parent dropdown
The overview page will display these relationships by showing “Part of [Parent Name]” under each child institution.
Importing Institutions from CSV#
For bulk operations, CODA allows you to import multiple institutions at once from a CSV file. This is particularly useful when:
Setting up CODA for the first time with your complete organizational structure
Updating identifiers for many institutions at once
Importing institutions from another system
CSV File Format#
Your CSV file should use semicolons (;) as separators and include the following columns:
internal_id;name;ROR;ISNI;Ringgold;parent;usableAffiliation;archived
Column descriptions:
internal_id (optional): A unique identifier for the institution in CODA. If not provided, CODA will auto-generate one. Use this to link parent institutions and for reliable re-imports.
name (required): The institution’s full name
ROR (optional): ROR identifier URL
ISNI (optional): ISNI value (16 digits)
Ringgold (optional): Ringgold numeric ID
parent (optional): The internal_id of the parent institution (see below)
usableAffiliation (optional):
trueor empty to enable as author affiliation,falseto disablearchived (optional):
trueto mark institution as archived,falseor empty for active institutions
Example CSV:
internal_id;name;ROR;ISNI;Ringgold;parent;usableAffiliation;archived
inst_ABC123;University of Example;https://ror.org/02mhbdp94;;;;;true;false
inst_XYZ789;Faculty of Sciences;;;123456;inst_ABC123;true;false
inst_BIO456;Department of Biology;https://ror.org/05dxps055;0000000121032683;;inst_XYZ789;false;false
You can download an example schema file here.
Understanding the Parent Column#
The parent column uses internal_id values to reference parent institutions. This makes hierarchies more maintainable and allows you to reorder rows without breaking relationships.
Example from the CSV above:
Row 1: “University of Example” (internal_id=inst_ABC123, no parent)
Row 2: “Faculty of Sciences” (internal_id=inst_XYZ789, parent=inst_ABC123)
Row 3: “Department of Biology” (internal_id=inst_BIO456, parent=inst_XYZ789)
This creates: University → Faculty → Department
Auto-Generated IDs
If you don’t provide internal_id values in your CSV, CODA will automatically generate them (format: inst_XXXXXXXX). You can export your institutions later to get the generated IDs for future updates.
Import Process#
To import institutions:
Click the Import button on the Organization Structure overview page
Click Choose File and select your CSV file
Click Import to upload and process the file

CODA will:
Create new institutions that don’t exist
Update existing institutions using smart matching (see below)
Set archived status based on the
archivedcolumn (active institutions can be archived, and archived institutions can be reactivated)Validate all identifiers and skip invalid ones (import institution but without identifier)
Show a summary of successful imports and errors, if any
Smart Matching Priority
When importing, CODA uses the following priority to match institutions:
internal_id (highest priority): If provided and matches an existing institution, that institution is updated
External identifiers: If the institution has a matching ROR, ISNI, or Ringgold ID, it will be updated
Name matching: If no ID matches, CODA matches by institution name
This makes it safe to re-import updated files - institutions with internal_id will be reliably matched and updated instead of creating duplicates.
Import Results#
After importing, CODA will display:
Total institutions processed
Matching statistics: How institutions were matched (by internal_id, by external identifier, or created new)
Fully imported: Institutions created/updated without any issues
Partially imported: Institutions created but with some invalid identifiers that were skipped
Error details: Which institutions had problems and what the issues were
Handling Import Errors#
Common import errors include:
Invalid ROR format: Make sure ROR IDs start with
https://ror.org/Invalid ISNI format: ISNI must be exactly 16 digits
Invalid Ringgold: Must be a numeric value
Parent reference errors: Make sure the parent internal_id matches an existing institution
Duplicate internal_id: Each internal_id must be unique
If an institution has an invalid identifier, CODA will still import the institution but skip the problematic identifier. This allows your import to continue even if some data needs correction.
Exporting Institutions to CSV#
You can export all your institutions to a CSV file for backup, reporting, or updating in bulk. The export includes all institution data including auto-generated internal_id values.
To export institutions:
Click the Export button on the Organization Structure overview page
A CSV file will be downloaded to your computer with all current institutions
The exported CSV file:
Includes all institutions (both active and archived)
Contains all identifiers (ROR, ISNI, Ringgold) and internal_id values
Includes the archived status for each institution
Uses the same format as the import CSV, so you can modify and re-import it
Shows parent relationships using internal_id values
Round-Trip Workflow
You can export institutions, modify the CSV file (e.g., update names, add identifiers, change hierarchies), and then re-import the file. CODA will use the internal_id column to reliably match and update existing institutions.
Archiving Institutions#
When an institution is no longer active but you want to preserve its historical data, you can archive it instead of deleting it. Archived institutions:
Remain in the database with all their relationships intact
Are hidden from most selection dropdowns (e.g., author affiliations, parent institution selectors)
Can still be viewed and searched when “Include archived” is enabled
Can be restored later if needed
Cannot be deleted while archived
How to Archive an Institution#
To archive an institution:
Navigate to the institution’s detail page or find it in the list view
Click the Archive button
In the modal that appears, choose one of three archiving options:
Option 1: Archive without successor
The institution and all its child institutions are archived
Use this when an organizational unit is discontinued without a replacement
Option 2: Create new successor institution
CODA creates a new active institution to replace the archived one
Child institutions are moved to the new successor
The original institution is archived
Useful when an organizational unit is restructured or renamed
Option 3: Select existing successor
Choose an existing active institution to inherit the children
The archived institution’s child institutions are transferred to the selected successor
Useful when merging organizational units or when a department moves under a different parent
Important
If the institution you’re archiving is set as your home institution in global preferences, you must select or create a successor. CODA requires a home institution to be active at all times.
What Happens When You Archive?#
When an institution is archived:
Timestamp: The
archived_atfield is set to the current date and timeVisibility: The institution disappears from active selection lists but remains searchable with “Include archived” enabled
Child Institutions: Behavior depends on the archiving option chosen (see above)
Historical Data: All existing relationships (funding requests, invoices, author affiliations) remain intact
Future Use: The institution can no longer be selected for new author affiliations or as a parent for new institutions
Restoring Archived Institutions#
If you need to reactivate an archived institution, you can restore it. This might be necessary if:
An organizational unit is reactivated after a temporary closure
The institution was archived by mistake
Organizational structure changes require bringing back a previously archived unit
How to Restore an Institution#
To restore an archived institution:
Enable “Include archived” on the Organization Structure overview page to see archived institutions
Navigate to the archived institution’s detail page or find it in the list view
Click the Restore button
In the modal that appears, choose a restore option:
Option 1: Restore without children
Only the selected institution is restored
Archived child institutions remain archived
Useful when you want to reactivate a specific organizational unit but not its entire structure
Option 2: Restore with children
The selected institution and all its archived child institutions are restored
The entire organizational tree is reactivated
Useful when restoring a complete organizational hierarchy
Parent Selection During Restore#
If the archived institution’s parent is also archived (or was never set), CODA will show a parent selector in the restore modal. You can:
Select a different active institution as the new parent
Leave it blank to restore the institution at the top level
If the institution had a parent that is still active, that parent will be automatically selected by default. If the institution’s parent was also archived but has an active parent (grandparent), the grandparent will be pre-selected for convenience.
Tip
When restoring an institution whose parent was also archived, CODA automatically suggests the grandparent institution as the new parent. This helps maintain logical organizational hierarchies.
Deleting Institutions#
CODA allows you to permanently delete institutions that are no longer needed and have no dependencies. This is useful for cleaning up:
Erroneously created institutions
Test data
Duplicate entries
When Can You Delete?#
You can only delete an institution if all of the following conditions are met:
The institution is not archived (you must restore it first if needed)
The institution has no child institutions
The institution has no institutional identifiers (ROR, ISNI, Ringgold)
The institution has no active funding sources being used in invoices
The institution is not set as the home institution in global preferences
How to Delete#
To delete an eligible institution:
Ensure the institution meets all deletion criteria (see above)
Navigate to the institution’s detail page or find it in the list view
Click the Delete button
A modal will appear showing:
Confirmation message if deletion is allowed
List of blocking reasons if deletion is not allowed
If allowed, click Delete to permanently remove the institution
Warning
Deletion is permanent and cannot be undone. If you’re unsure, consider archiving the institution instead. Archived institutions preserve all historical data and can be restored later if needed.
Understanding Blocking Reasons#
If you cannot delete an institution, the deletion modal will explain why. Common blocking reasons include:
Child institutions: The institution has sub-organizations. Archive or reassign children first.
Identifier(s)/link(s): The institution has ROR, ISNI, or Ringgold identifiers. Remove these first if you still want to delete.
Active funding source(s): The institution has funding sources currently used in invoice positions. This means invoices are funded by this institution.
Set as home institution: The institution is configured as your default home institution in global preferences. Set a different home institution first.
Archived Children
When viewing an archived institution’s detail page, you can see its archived child institutions in the “Child Institutions” section. These are marked with a red “Archived” badge for easy identification.